There are basic things in the world almost everyone knows how to do. Think of making an egg – an elementary culinary act that nourishes while requiring little skill. But while you may think it’s a no-brainer, ask ten people to make an egg, and you’ll get ten different dishes.
Planning a software product is a lot like asking people to make an egg. If there was a product backlog for a meal made of eggs, it would probably include user stories like:
#1. As a user, I want my meal to be filling, so I can eat it as a complete meal;
#2. As a user, I want my meal to be solid, so I can eat it using a fork;
#3. As a user, I want my meal to be highly seasoned, so I can eat it without adding spices;
#4. As a cook, I want a meal that takes no longer than 10 minutes to make, so I can prepare it fast;
#5. As a cook, I want a meal that consists of few ingredients, so making it takes less effort.
Our example is minimalistic, but it is kind of a usual flat backlog, right? Now, can you tell what type of meal we’re talking about here? Is it an omelet, a hard-boiled egg, or a poached one? The stories are written in the vertical order, meaning that the most important items are on top. But is nutrition value really more important than taste qualities?
Product backlogs were created to communicate product requirements and vision. While a flat product backlog is a common practice for any agile project, in its traditional form, it has lots of limitations. In 2005, agile practitioner, Jeff Patton, developed a new way to arrange user stories in a backlog. The approach named User Story Mapping as described in Jeff’s book quickly became a widely used practice in product development. So, in this article, we will look at the main advantages of story maps, how they are built, and in which cases you definitely need it.
The Problem with a Flat Backlog
As in the egg example, structuring your user stories in such a manner provides little context to clarify what you are building, how, and why. So, utilizing a flat backlog for product development may have some challenges:
User story prioritization. User stories describe specific tasks or features, representing functional requirements requested by users. To work on a product, a development team needs to set priorities on what stories are more important to be released earlier. Prioritization techniques like MoSCow or Eisenhower Matrix are used to define levels of value to ease release planning. But, at the same time, stories written in a top-down fashion cause a conflict of priorities.
Contextual lock. Each story describes a piece of future functionality, which is okay on its own. However, a software program broken down into small pieces doesn’t show the big picture. Thus, your team is risking putting too much attention on isolated features, instead of the product as a whole.
No shared vision. Consequently, the lack of general context also doesn’t help share a product vision. Stories are translated into tech tasks, providing instructions on what to build right now, without telling what’s coming next in the long run.
Doesn’t depict user journey. While a backlog is not a UX user journey map, it needs to depict what users can do with the system. In the format of a flat backlog, describing general user activities is difficult: epics (big stories describing general activities, e.g. authorization) tend to be decomposed into smaller, doable stories. As a result, the visibility of user activity is dimmed.
Considering existing backlog problems, Jeff Patton offered a story map as a way to visualize and structure stories. Story mapping soon became a popular technique used for managing agile projects. So now, let’s look closer at how story maps are built and what their real advantages are over a flat backlog.
What is Story Mapping?
User story mapping is a technique developed by Jeff Patton during his long practice as an Agile product owner/scrum master. A story map received its name because it helps map out user stories and other backlog items visually. Items are arranged in two dimensions: The vertical one denotes priority, while the horizontal one represents steps a user takes to perform actions in the system (user journey). Story maps as described by Jeff include such structural elements as:
Backbone. The backbone is the basis of the map. It consists of epics or themes, which describe overall user activities in the system, e.g. search products. Epics are arranged in a horizontal order as they represent steps a user takes while interacting with the product, which is basically a simple display of the user journey.
Stories. Unlike a flat backlog structure, user stories are arranged in both vertical and horizontal dimensions. User stories are grouped under corresponding epics, describing more specific tasks a user may require. If an epic describes a search phase, it may include stories like basic search, filtering products, advanced search, etc. When stories are prioritized vertically, they can be divided into releases.
User personas are fictional representations of people that will use the product/perform steps described in user stories. Created by UX specialists after user interviews, personas provide descriptions on who the users are, and how they might like to interact with the product. On the story map, personas are bound to dedicated epics they will be involved in.
Ideas and nice to have. To depict a full picture, a story map may also include sections like ideas or nice-to-have features. These will keep in mind user stories that are not required yet or not stated in initial requirements, but still add value to the product.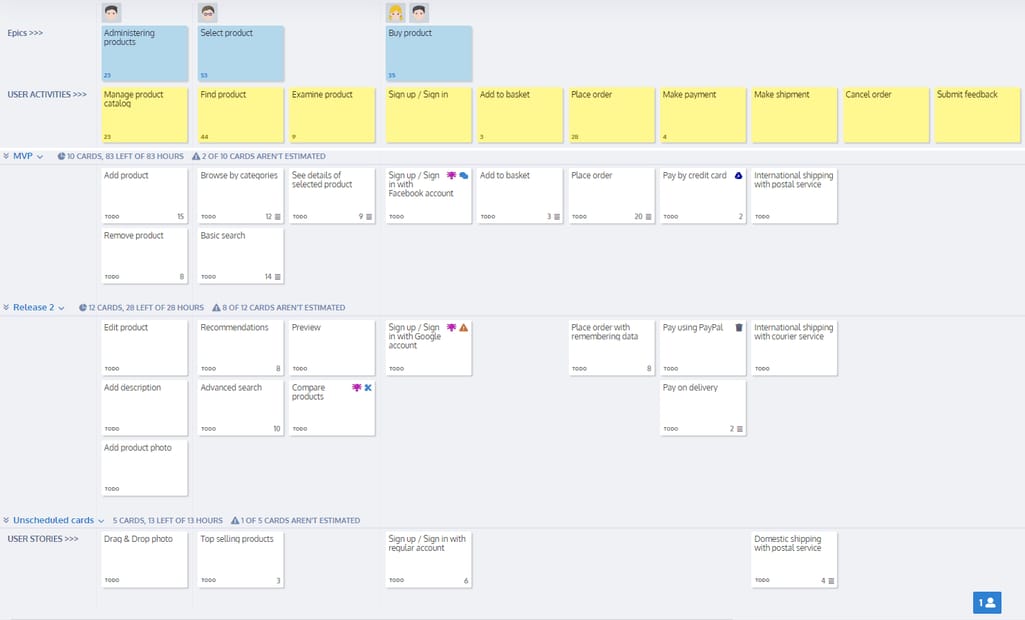
A sample story map for a commerce product. Source: storiesonboard.com
The mapping approach also stimulates productive conversation within a development team. While it can be managed by a Product Owner (PO) or Product Manager, the map itself is created in a story mapping workshop as a collaborative effort. During the workshop, members of the team can ask questions like “why do we need this story?” or “why are these stories more important than those?” This guarantees mutual understanding of development goals and the context of each story. Further, the map helps depict all the additional details about the product and communicate this information across the team.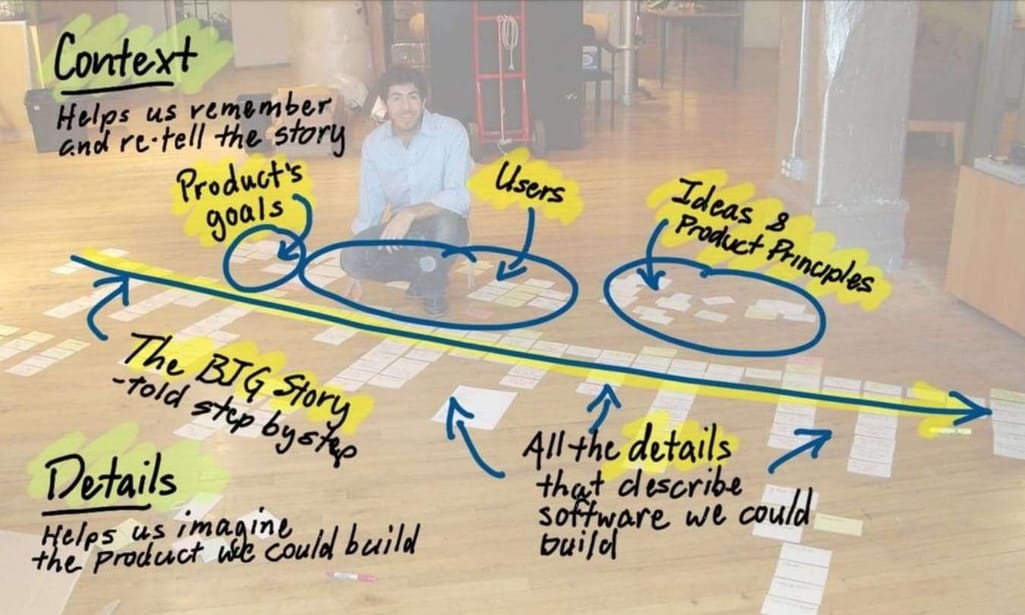
An illustration from Jeff’s book showing the concept of the story mapping process. Source: Patton, J & Economy, P, 2014, User Story Mapping book
In the most basic form, it can be built on a blackboard or table using colorful sticky notes. Story mapping as an alternative way to show what you are building helps overcome challenges presented by a flat backlog. Let’s quickly sum up the strengths of story maps.
What are the Advantages of Story Mapping?
The approach described by Jeff Patton is just one of many ways to structure the story map. In any case, the manner in which we organize backlog items inside the map offers the following benefits:
Clear priorities. The general approach of how a story map is structured makes it easy to prioritize each story, preserving the connection between big and small items. “Prioritization becomes easier as a story map begins with the backbone that is not prioritized. You need all of those things since they are required to create an MVP to start off with something. By using the backbone, it’s easier to see where stories or tech tasks belong and where the gaps in functionality are,” explains Vlad Khilchenko, a product manager at AltexSoft.
Built-in user journey. The backbone of a story map is an oversimplified version of a user journey map. While they are structured differently and are used for different purposes, the product team will be able to navigate the backbone’s steps. Additionally, each step can be widely expanded by stories, providing more context to each piece of functionality.
Visible product goals and vision. A story map is a dynamic document that will expand as the product grows. Having a bird’s-eye view of the project, and understanding where it starts and where it ends, the team can grasp the vision of the product and how to implement it on a technical level.
Helps to avoid backlog grooming. Large-scale projects may last years. As the product moves closer to its release, items in the backlog may lose their relevance, and thus should be reviewed. The act of backlog “cleaning” is called a grooming or refinement session. If you structure your backlog as a story map, items are always placed according to their priorities.
Better communication. Product backlogs are created by a single person, a product owner. Contrary to that, story maps are done during the mapping workshop that involves many team members. This facilitates discussion about the product right from the beginning.
As we can see, the practice of story mapping is a much more flexible and transparent approach to communicate product ideas. As any document in agile, it’s done with the purpose of building working software. That way, a map can be built in any way you want, given that you stick to the main idea.
What are the Best Use Cases for Story Mapping?
As a technique, story mapping is a good fit to solve the following problems:
Outlining Minimum Viable Product. One of the biggest challenges occurring because of the odd prioritization in a flat backlog is defining what goes in MVP. Story mapping was created with this problem in mind, as it allows the team to identify what’s important now and put those items into the MVP release. Managing a more mature product, it’s better to use a product roadmap, as it offers similar capabilities without relying on the backlog changes too much.
Slicing large requirements into smaller items. Requirement documents often contain verbose descriptions that are hard to understand. They have too many technical solutions/integrations. Story maps are perfect for decomposing large tasks into smaller pieces, making them digestible for a team.
Improve communication with stakeholders. Understanding stakeholder’s requirements can be a pain. In the case of story mapping, not only does it support healthy discussion inside the product team, but also helps product/project managers involve a stakeholder (business owner) in the process. The business owner is one of recommended participants to include in mapping workshops. Facilitating the dialogue between the team and the customer makes it a lot easier to understand desired output.
Now that we’ve reviewed story map functions and advantages, let’s look at how we can approach story mapping in our own project and the viable steps to make it work.
The Process of User Story Mapping
How to approach user story mapping? The way you can implement it as an ongoing practice will differ depending on the size of your team, the scope and duration of a project, and the phase of the product’s maturity.
The best time to start with story mapping is when you’ve gathered all the product requirements, and team for the project is defined. The map itself can be either built on the basis of existing backlog(s) or as a standalone document.
Pre phase: Gather Documents and Choose the Mapping Tool
If you already have usable technical documentation for a project, take it with you. You ‘ll definitely need to look at the Product Requirement Document (PRD), standards, and estimates. Also, you should take a look at user personas prepared by a UX researcher.
Then, answer a simple question: What type of a story map are you going to build? The old school pen-and-paper method is easier, so if you decide to write by hand – prepare a blackboard, lots of sticky notes, felt-tip pens, markers, adhesive tape, and coffee.
If you plan to use a digital product, make sure it has a sharing function as a part of free/paid functionality, if you want the map to make sense. Today, there are many digital products that help teams either as a web-based shareable document or inbuilt CRM solution:
Expected output: Technical documentation is gathered and reviewed. Tools for story mapping are chosen.
Step 1: Select Members of a Story Mapping Team
Before you start, define the people you are going to build your map with. Story mapping is done in the form of a workshop that involves all the key persons from different departments. The outcome of this phase should provide a clear list of people who will participate.
In practical terms, you should consider only those people that can make decisions and take an active part in the discussion. Here is a hint: The workshop may include no more than 10 participants. Once the team gets bigger, you won’t be able to provide enough time to each participant. The fewer people you choose, the easier it will be to initiate a discussion between them.
Recommended as the head of the workshop: product owner/product manager/scrum master.
Recommended roles that should participate: engineer, UX designer/researcher, project manager, stakeholders (business owner or investors), marketing representative, business analyst, sales representative.
Expected output: the list of participants.
Step 2: Set the Frames of a User Story Map and Define Goals
As in the case of product roadmaps that pursue similar goals, a story map should have strict borders outlining what you are discussing at this moment. There is no need to cover those parts of the system that are not required yet. You may mention them in the ideas section. The best practice is to focus first on bringing a minimal viable product to life.
A Minimal Viable Product or MVP can be defined as an early version of a product that possesses the most important features only. Here’s an example. Imagine that you are forging a knife. Because a knife can be used for a variety purposes, it can have a lot of different features, including decorative ones. But the core use case of a knife is to cut or slice something. So, an MVP of a knife is a tool that has a handle, a blade, and a sharp edge.
Those three knife features that are allocated to the release of an MVP are not prioritized between each other. Why? Because the lack of even one feature makes the product value to zero. Jeff Patton suggests using the term Minimum Viable Solution instead of MVP. So, the definition for it is: “The minimum viable solution is the smallest solution release that successfully achieves its desired outcomes.” Focusing on MVP in scope definition for the map will guarantee that you include the required basis for the product.
At this phase, you should also define what will be put on the map. User personas, user stories, and epics are the must-haves to build a proper map, as well as a release outline. But you should also determine whether you need some additional sections such as:
- Ideas section
- Thrash section
- Tentative section
The next step is to understand whether you must mark what is done on the map and whether you want to provide even more context to the stories or divide them into different types by user personas. Of course, it can be done right at the workshop: Different explanatory items can be easily added to the map with the help of color-coding. But, it’s better to be defined at this stage of planning.
Expected output: the scope and format of the map.
Step 3: Implement User Personas
Provided by the UX or marketing department, user personas will serve as a basis for your map. Without knowing who your users are, you won’t be able to understand the epics of the product, and so will miss the whole point of story mapping. Having user personas or talking to UX staff, you can define who the people are that will perform certain actions in the system.
Expected output: User personas are defined and listed.
Step 4: Appoint the Meeting and Onboard Participants to Story Mapping
When all the participants are accounted for and you have prepared everything on the practical side, it’s time to explain to the members what you are going to do. Start with a warm-up and just talk to people for a few minutes. At every meeting, it’s important to make participants feel comfy enough to take part in the discussion and share thoughts.
Next, elaborate on how a story map works, and what you expect from participants. The main point here is to communicate the goals and align the team’s understanding. After that, you should explain the structure of the map:
- If you are utilizing color coding, explain what each color means. Does it describe the type of item or its priority?
- Tell the members how exactly the items must be placed on the map
- Explain additional options, like the ideas or nice-to-have section
The leader of the meeting may be the one to write the information on sticky notes, but each member can do it on their own. So, each participant should be acquainted with the rules.
Expected output: All the members understand what you are going to do, what you want to get as a result. All the structural elements of the map are explained to the participants.
Step 5: Conduct the Workshop
After explaining all the necessary information, you will begin building an actual map. The map itself starts with writing user activities, based on user personas. User activities are provided in the form of epics. So that will be our backbone for the future product, the steps a user can perform, the steps that denote our particular product.
Take a look at the example built with the StoriesOnBoard tool. You may click on the image to open it full screen: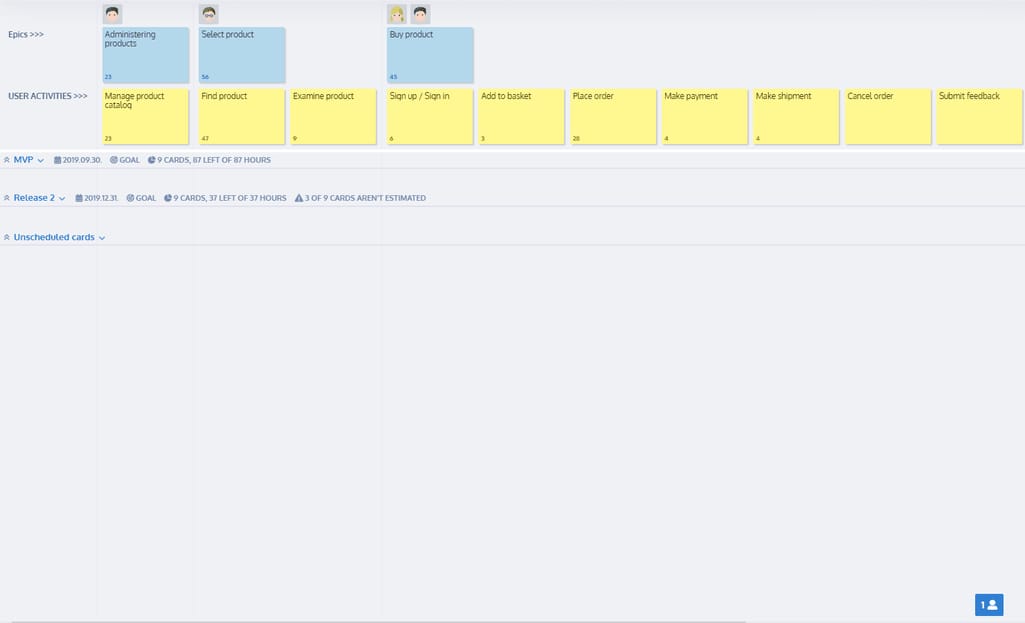
Each epic is assigned with corresponding user persona and decomposed to user activities
As you can see, epics describe the general tasks a user can possibly do. Human face icons floating above the epics are the user personas that each epic is assigned to.
When writing the epics, think of a user persona description, as it will provide the key information on how to formulate the epic precisely. Then, break them down into activities a user can do, in the action frame of the epic. Keep in mind that user activities are not user stories; they should define a piece of the process, not a feature.
Expected outcome: The backbone of the story map is written.
Step 6: Write User Stories
Now we’re going to have a go at the low-level details. In a flat backlog, user stories are written as follows: “As a user role I want to action so I could motivation.” The format of user stories provides enough detail when we talk about separate features. So you can use this format in your map or simplify them to tech task format, e.g. add drag and drop to upload a file.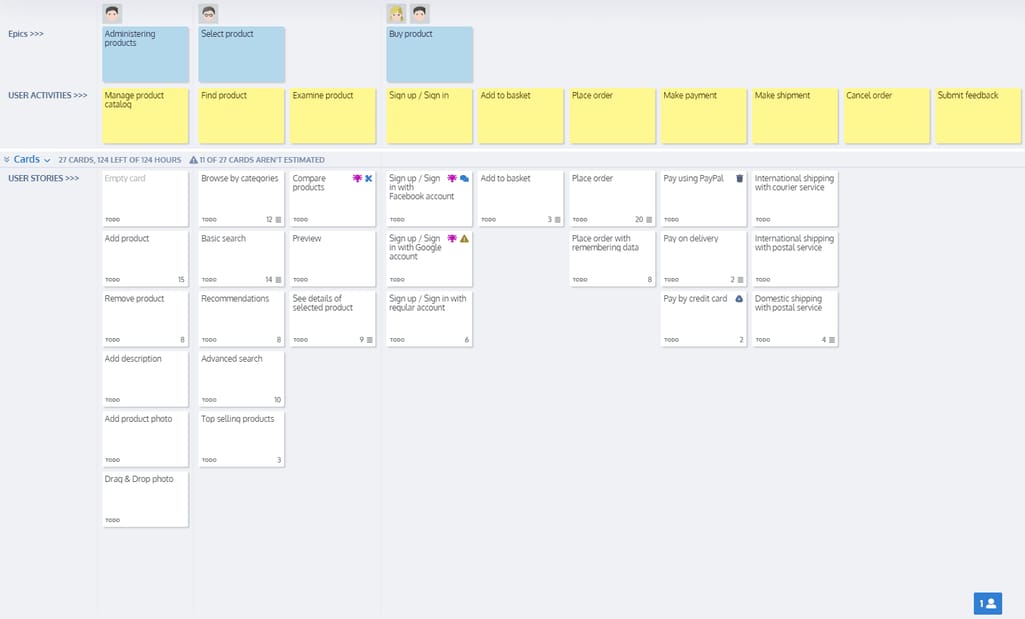
User stories are allocated by user activities/epics
As we already group stories across epics that have assigned user personas, the classic format of a user story is not obligatory.
The number of stories and their details depend on what phase of project preparation you are in right now. But, at a minimum, keep the focus on MVP (or Minimum Viable Solution).
Expected outcome: user stories decomposing epics and user activities.
Step 7: Prioritize Stories and Outline MVP
Now we have three levels of items describing our product in detail. Our task is to sort out the most important features and plan releases. Allocation of user stories by importance can be done by various methodologies we have mentioned before.
In the case of sticky notes, release planning is done using a tape. All we have to do is just separate the stories block so that each block visually defines a release. Digital products offer wide functionality to group, outline, color code, and allocate notes.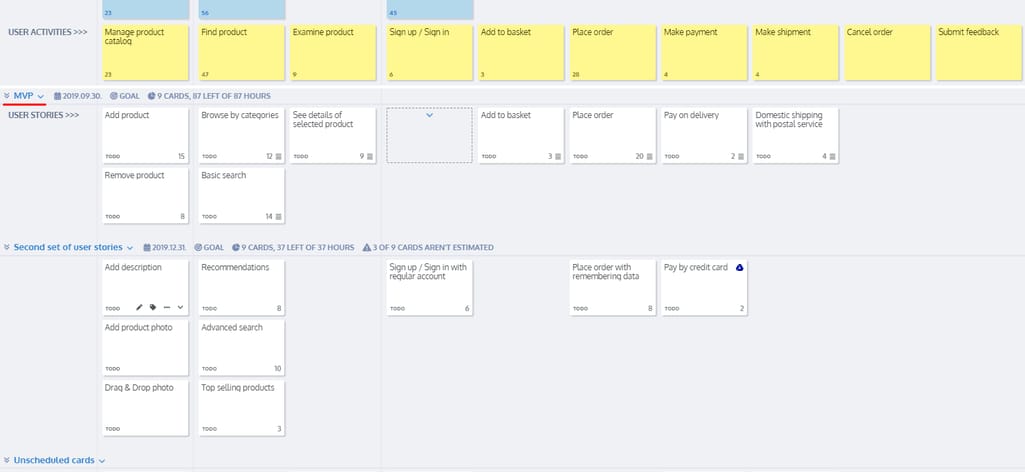
Now user stories are prioritized and put into blocks of releases, an MVP release comes first
At this stage of prioritization, we also outline which stories will go into the MVP release. The choice should be discussed with the team, considering the opinions of those participants who can provide a data-driven argument. Those people are a UX researcher, a business analyst, or a market researcher.
When you define the rest of the releases, you can estimate each release separately to provide the team with time frames. Or dates and estimates can be put in a separate document called Release Plan. A release plan is a type of product roadmap that defines time frames for delivering each part of the software without elaborating on tech details.
Expected outcome: User stories are prioritized to releases
Step 8: Arrange User Stories That are Left
During the discussion, you will probably generate some extra ideas. Usually, prioritization techniques consider a separate category for stories that are nice to have. So, don’t forget about them.
Another important section that you should definitely have is a thrash section. Thrash may sound a little... harsh, but it's a section where your put stories that you don’t need. The importance of this section may not be obvious. However, as the product becomes mature, you can expect a change of priorities or new requirements. So, keep everything organized and clear to extract this data when it’s required.
After releases are set, you will have to update the information on the map so that it remains relevant to the current state of the project.
Story Map Maintenance Tips
The map is not static. It will require proper management over time, so also keep in mind the features of the map that will be added in the process:
Use note status markers. When the feature is done or there are some delays, add this info to the map. Consider marking each note (with the user story, or the whole user activity) with the status:
- To do
- Done
- Tentative
- Requires review
- To remove
These statuses make what’s happening with the product clear and what part of the job is done correctly.
Put some risk notes. A risk note is a unit that denotes a high probability of failure. In product development, each feature is based on the assumption that a user needs it. However, this doesn’t work all the time.
The example of the risk may also be a need to integrate with a third-party solution, or dependency on the unstable solution/service. Putting risk notes on the map helps keep this information in sight and probably saves your budget.
Make stories testable. As we already mentioned, each user story that exists in the backlog or story map is just an assumption based on market research, business analysis, and user interviews. Each assumption can be wrong to some degree or wrong entirely. So, consider making stories testable. One of the ways to check if the assumption is true is to conduct user acceptance testing, which is basically testing that involves real users.
Can the Story Map Replace Product Backlog?
Product development is a tough process that requires efficient tools to drive it. A flat backlog can be enough to communicate product ideas, but its format makes it difficult to understand and share across the team.
“The main advantage of a story map is not the map itself, but the approach to structuring backlog. You may build a flat backlog and it will contain all the necessary information about releases, sprints, timelines, and pieces of functionality. But the map makes it more vivid because it shows the connections visually, and has a place for explanations,” states AltexSoft’s Vlad Khilchenko as an argument for story mapping. So, it should be considered a neat practice to building a good backlog, rather than an alternative document to replace it.

